Sunday, 7 December 2014

More Like LOLCSH, Amirite?

Like many aspects of library cataloguing, controlled vocabulary subject headings hark back to the days of catalogue cards. In those dark before-times, a physical card had to be typed up for each subject heading included in a catalogue record, and filed in boxes with other cards relating to the same subject.

Photo from the UNO Criss Library Flickr stream, taken in 1976

In my opinion, these days controlled subject headings are mainly a search tool for staff with library training. A concise summary or abstract with some juicy keywords thrown in is just as, if not more important for customers searching an online catalogue, especially in a public library setting. Yes, subject headings can provide some keywords for searching, but often they aren't quite in natural language, which means they don't help the general public. After all, who's going to search for "swine" when the generally used word is "pigs"?

Recently I've seen some records on Libraries Australia trying to counteract this by using the 653 MARC field for uncontrolled terms. While I admire cataloguers who strive to make their records more searchable by customers, I'm not sure that this is the solution. Crowdsourced tagging is used on Trove and in some library catalogues, but is it useful to add tags from the back office? After all, the whole point is that tags are not proscribed and have meaning for individual library users. I wonder whether using the 653 field is actually counter-productive, adding more potentially irrelevant search terms to the record.

Public libraries in Australia mostly use Library of Congress Subject Headings (LCSH). The slightly odd terminology and syntax of the taxonomy, coupled with unfamiliar Americanisms and the sometimes frankly bizarre contents of that venerable Library's collection can result in great amusement for cataloguers... Or maybe just for me...

Anyway, here are a few of my picks of the oddest and most LOL-worthy (or at least WTF-worthy) headings I've come across. All screenshots are from the Library of Congress Authorities, which are freely available on the web without a subscription.

Industrial feeding
For me this term conjures up horrific images of force-feeding, but no, it's actually deemed the correct term for cafeterias in industrial settings.
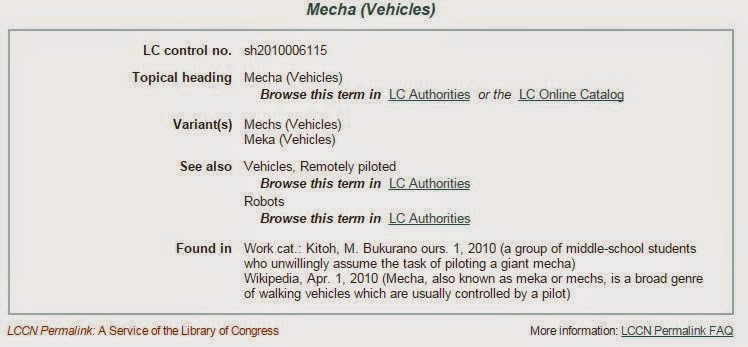

Mecha (vehicles)
I was a HUGE fan of Neon Genesis Evangelion when it came out, so this heading for giant, piloted robots holds a special place in my heart.


African American lesbians in motion pictures
This one falls firmly into the "oddly specific" category. LCSH has headings referring directly to ethnicity, religion and sexuality for almost any subject you can imagine. This could be seen as good (representing the diversity of American society) or bad (perpetuating the American obsession with race and sexual morality) depending on your perspective. See also Lesbians on postage stamps.


Cooking (Semen)
There's a specific source quoted for this authority record, and technically if there's even one work on a subject in the Library, there has to be a subject heading created for it. I'm hoping it ends there, but frankly I don't care to investigate any further.


Animals -- Infancy
A perfectly reasonable heading, in that you would want baby animals to appear as a subdivision of animals as a whole. Unless you're cataloguing kids' DVDs about baby animals. Then it just sounds a bit pompous.


Plus Bonus Name Headings!

2 Chainz
Name authorities for rappers are always great material, but this one takes the cake with its fantastic listing of variant names.


Santa Claus
OK, so technically this is a subject heading, not a name heading. But notice there's no qualifier for "fictitious character." Maybe the staff at the Library of Congress know something we don't...


If you've found a good one that's missing from this list, post it in the comments for our incredibly niche amusement. Now I'm going to end this post with a relevant Youtube video from Yankovic, Al, 1959-


Thursday, 6 November 2014

Capital Ideas

Last week I made the pilgrimage up to Canberra to attend the 2014 Libraries Australia Forum at the National Library of Australia.


As a cataloguer, I use the ANBD component of Libraries Australia every day.  Since my team and I contribute a large number of CD, DVD and console game records to the database, I thought the Forum would be an valuable learning experience, and I wasn't disappointed.  It was a great opportunity to meet NSW and ACT librarians, chat with some of the Libraries Australia team and get a bit of a glimpse behind the curtain.  There were also some excellent speakers, including:
  • Keynote speaker Carl Grant on using library technologies to benefit our users and communities
  • Geoff Strempel on the challenges and rewards of implementing a statewide library consortium and one-card borrowing across South Australia
  • An expert panel on ebooks and how they fit in (or not) with collaborative initiatives such as interlibrary loans and purchasing consortia
  • Robyn Van Dyk on how the Australian War Memorial (AWM) is using digitisation, linked data and crowdsourcing to make information on Australian soldiers available to the public
  • Mylee Joseph on collaborations with non-library organisations, through some very exciting projects at the State Library of New South Wales (SLNSW)
You can find audio recordings and PowerPoint presentations from the day on the Forum website, but here's some of what I took away from it:

Working with the "Outside World"
As far as I can see, the library industry and its public profile are shrinking (or at least changing in challenging and unexpected ways), but the world needs our skill set more than ever.  Terms like "metadata" and "search optimisation" may be buzzwords, but they're also concepts that library professionals have been dealing with since the days of card catalogues.

The speakers put forward some great points and ideas about how libraries and other GLAM organisations are seen, what we we can do to raise our profile and help our image:
  • Grant talked about how frustrating and damaging it is to be branded as "that place where you get books."  He said we need to ask people (not just library users!) what they want and embed our services in their lives.
  • We need to "speak the same language" as our users and partners.  Grant made it clear that the average library website is a lumbering, complex dinosaur in the age of Google-style searching, and called for a common, cross-institutional search interface.  Mylee talked about SLNSW's partnership with Wikipedia and its community of editors, and how important their Project Page is for communicating within that space.
  • Mylee also talked about how getting digitally available library resources out onto the open web can promote the institution and increase traffic to library websites.  She gave the example of uploading picture collections to Wikimedia Commons.
  • Robyn and the Libraries Australia team talked about crowdsourcing of the AWM Nominal Rolls and Trove, and how, though it might be scary at first to let the public go behind the scenes, it can yield some truly wonderful results.
  • And then there's my pet subject and HUGE buzzword - makerspaces. There are a lot of people who question their place in the library space. Carl pointed out that they provide an opportunity to facilitate connections between people in our communities within similar disciplines and interest groups, and to provide startups with information on aspects like grant applications and patents.

The Vendor/Library Relationship
Oh dear.  As both a cataloguer and a vendor, I've become used to getting the occasional strange look at events, but I was slightly confronted by the perspective I got at the Forum.  Here's a Twitter conversation I had during the ebooks panel:


With all due respect to Hugh, this shows the prevailing "us vs. them" attitude, which I find completely counter-productive.  The theme of this year's ALIA National Conference was "together we are stronger", and the Forum was all about collaboration both within and outside the GLAM sector.  In the end, vendors, suppliers and libraries are all in the same industry, and we depend upon each other for survival.  Yes, we're trying to sell you stuff, and yes, you're trying to get the best deal out of us.  But that doesn't change the fact that many on the vendor side consider ourselves LIS professionals, and our ultimate goal is to enable libraries to provide better products and services to their communities.  I like to think we can work with this.

TL;DR: WHY CAN'T WE ALL JUST GET ALONG?!?!?!

I also found out how costly the problem of poor MARC records from vendors can be for libraries, and how far-reaching their impact is on Libraries Australia.  I may have taken some satisfaction from the fact that I work for a vendor with a knowledgeable cataloguing team who take pride in their work - if I do say so myself.

The Cult of Perfection
Cataloguers are infamous for pursuing the mythical Cult of Perfection, lovingly crafting records and obsessing over minutiae. But this hinders productivity, and means losing sight of the ultimate goal of all library services: To better serve our customers.

  • One of the best catch phrases to come out of the Forum was Robyn's comment that "it's doesn't have to be perfect to be useful".  The AWM Nominal Rolls provide ease of access to a set of linked records which were previously very difficult to gather together, even if they don't perfectly meet all the metadata standards.
  • Geoff spoke about how perfection was not an option is establishing the South Australian consortium, because it had to cater to the requirements of 80 different library services, covering a hugely diverse range communities.  It was more important to create systems that were flexible.  He used the term "perpetually beta" because library users ended up being "co-developers," contributing their feedback so that library products, services and systems could evolve to meet their needs.
  • In Mylee's summary of SLNSW's Wikipedia collaboration, she commented that no project on Wikipedia is ever finished, as such.  It can take some getting used to, but on the other hand, continuing contributions can lead to completely unexpected improvements, such as additions to the article on the journals of the First Fleet.

This definitely doesn't cover the whole experience, but I hope it gives you as much food for thought as it did for me.  You can see the rest of the conversation on Twitter.

Wednesday, 15 October 2014

Makers Gonna Make

Last Saturday I volunteered at She Makes, the first makerfest run by Girl Geek Academy, a newly founded organisation that aims to teach girls, women, ladies and females of all persuasions about nerdy things like startups, coding, 3D modelling and electronics.

Throughout the day, three 'streams' ran simultaneously:
  • Wearables - A series of workshops based around two wearable technology kits: a programmable LED belt and Firewalker LED sneakers.
  • 3D Printing - An introduction to 3D modelling using Tinkercad and Sketchup, with an opportunity to print the finished model
  • Maker - Hands-off talks for the curious about maker culture, wearable tech and 3D printing
I helped out with the 3D printing stream. The participants worked through the self-guided tutorials available for Sketchup and Tinkercad, and Emily, Shristi and I roved around helping participants to download and start using the software, troubleshooting problems and picking up where the tutorials left off. I was definitely hovering on the edges of my own knowledge, but we had a great crowd to work with. The people I spoke with were positive, enthusiastic, and very much willing to work through the problems and challenges. The aim of the day was for participants to create their own interpretation of the She Makes robot, seen here acting as my volunteer badge:


A bunch of 3D printers - including my own Scarface (left) and April's utterly fabulous Hello Thingy (right) - were waiting to print out the results. There were some awesome first-time efforts, including this one and this pair.


The workshops were broken up by a series of excellent talks:
  • Anne Marie Shillito blew my mind with her artistic, creative approach to 3D printing. My 3D printing education has been entirely from an engineering and electronics point-of-view. At my hackerspace, printers are usually used to fabricate parts for other printers, enclosures for electronics and other precision items, designed to fit their task, but not for aesthetic value. As I listened to Anne Marie talk about what artists and designers are doing with additive manufacturing, I realised that there are plenty of people out there who approach this relatively new craft from the same point of view as me. Check out her book Digital Crafts and her website for some serious inspiration.
  • Dr. Aakanksha Chhikara talked about the process of developing her exciting new wearable tech product, the Mor Bracelet. And she mentioned that she did some of her prototyping with Scarface - I was a very proud robot mama! Aakanksha also had some great advice about the challenges of being a woman in engineering and technology. She stressed the importance of having a professional network with whom you can blow off steam and find inspiration. It seems librarians have the right idea...
  • Kirsteen from Etsy Australia presented on turning your making into money-making. My day job is in library cataloguing, so I appreciated that she talked about using the right keywords to make sure your Etsy listings show up in web searches. She also mentioned that Etsy recently changed their policy to allow 3D printed items to go up for sale in their Handmade section. They consider 3D printers to be the new sewing machines, which I love, because I see 3D modelling and printing as an extension of traditional craft techniques.
  • Finally, Scott Phillips (yes, we let blokes in) talked about his work with The Robots Are Coming, teaching school kids to make 3D models using Tinkercad, and print them using his Up printers. He had some great stories to tell and pictures to show.
The day ended with a panel, which I was part of. I got a chance to talk briefly about my paste printer project. Another panellist talked about how important 3D printing and Arduino are for breaking down the financial barriers to product development, which is such an important point. We need to get the word out that these technologies aren't just about making plastic toys and flashing lights - it's an enabler for local businesses.

Overall I LOVED She Makes, and look forward to helping out next time as well. The atmosphere was so welcoming and participatory that even though I didn't know all the volunteers or participants, I really felt like I was amongst friends.

If you missed out or just want to relive the memories, check out the Twitter stream.

Sunday, 21 September 2014

Geekier Homes and Gardens

Articles about 3D printing tend to focus on the big, mind-blowing, high-tech applications of this method of manufacturing. But I'm perhaps more fascinated with the small, everyday ways in which 3D printing can change the way we do things. I'm especially interested in the intersection of the traditionally masculine field of high technology, and the traditionally feminine realms of crafts and homemaking.

Which brings me to using my Makerbot Thing-O-Matic for interior decoration.

I've lived in rented houses for years, and I like to have art on my walls, so I've become good friends with 3M's Command range of reusable hooks and adhesives (no, they're not paying me to say this).  They do have a good range of products, but what happens when you get something a bit more unusual, something that needs a customised wall mount?  Something like this fabulously nerdy foam Minecraft pickaxe...  The answer is to design your own, of course!  And I've found through experience that the Command adhesive strips work really well with ABS plastic, so even those of us who can't nail stuff into our walls can create custom hooks and wall mounting systems.

So the first step to create your own custom wall mount is to measure up your item.  It's important to get your measurements accurate to the millimetre, so you'll need a good pair of digital callipers.  Get to know them well, because they'll become one of your most useful tools for 3D designs that interact with other objects:


When you have the measurements you need, you can start modelling.  For the pickaxe, I decided to make a mount with a square ledge on the end that would cup the "pixelated" edges of the handle:


When modelling for this I made the square sections a couple of millimetres larger than the actual edges of the pick, so the pick would comfortably nestle into the mounts without being squeezed in, which might damage the foam.  Here's what the final model looked like in SketchUp:


You might notice all the guide lines around the models.  These are created using the tape measure tool in SketchUp and are essential for creating millimetre accurate models.

No matter how carefully you take your measurements, be prepared for a bit of trial and error when printing precise models like this.  You may find you have to tweak the model a few times before it prints out to exactly the correct dimensions.  I've had this experience a bunch of times, especially when making accessories for my OrdBot 3D printer.  In the case of these wall mounts though, they miraculously worked first time.  Victory is sweet!  Here's the finished product on my lounge room wall:


If you look closely, you can just see the Command adhesive strips peeking out from below the mounts.  I had to trim them down a bit to make them fit.

I've also printed a multi-pronged hook to hang aprons in my kitchen, though I didn't model it myself.  It's from this Thingiverse model.


I've never used 3D printed mounts or hooks to hang anything heavy, but given that ABS plastic is used in car bumper bars, it's extremely robust and I'd be interested to see how much weight it can bear.  I just might not do that testing in my rented home...  Because ABS is so hard and robust, it can also withstand having holes drilled through the plastic and being nailed to a wall, without the plastic warping or shattering.

If you have a Minecraft pick of your own and would like to display it in all its glory, my model is available on Thingiverse.

Monday, 31 March 2014

Movement at the Station

Between moving house, recovering from an injury and (I'll admit it) some good old-fashioned procrastination, my ORD Bot has been sitting around and gathering dust for a few months.  A couple of weeks ago I decided it was high time to look it over again, see what needed to be done and continue with the build.

In my last post I described the issues I was having with my extruder, a 3D printed peristaltic pump design. I tried printing out some shims to see whether I could get the pump to work, but without luck. In the end I decided the best option is to work with a commercial product, which is tried, tested and has particular types and brands of tubing which are guaranteed to work with it. To that end I bought a pump from Adafruit. The best approach will probably be to remove the DC motor and attach a stepper motor.

But that's in the future - I decided that before messing around with the extruder again, it was time to get the machine moving.

The first step was loading firmware onto the RAMPS board. There are many flavours of RepRap firmware, but it was suggested a while ago that I use Marlin, because it's specifically configured to use with an LCD display. There are also a bunch of people at my hackerspace who use it. So I went in with my printer and laptop and asked for help - and by help I mean I got a couple of hackers to configure the firmware while I watched and asked questions. It was really important to take this step back, because I was able to get away from my frustration and reservations, and actually learn about my printer and how it works.

My main take away was that firmware isn't as intimidating as it might seem. The Arduino IDE is used to open the firmware, configure the settings and then upload it to the RAMPS board. I expected that upon opening Marlin in the IDE I'd face an impenetrable wall of code. In fact, there are plenty of explanatory notes and a lot of the terminology is common sense once you get your head around it:


I was also daunted by the number of tabs, each of which deals with a different aspect of the firmware, but it was explained to me that I only have to worry about the Configuration.h tab.

I still have A LOT to learn, but I'm now much less anxious about going forward. At the end of that first session, the endstops were all connected and the minimum limits set. The printer and my computer were connected and communicating, so I could control the movement of the axes through my printing software:


This was incredibly exciting! But it also brought up some other issues which needed to be dealt with.

The most pressing issue was that the z-axis wasn't moving properly. The rods that the extruder carriage moves on weren't turning evenly, were stalling, and after a certain point would move the carriage up, but not back down. My partners in crime decided that the best approach was to loosen the two z-axis stepper motors (which the rods are attached to), and move them around until the rods lined up correctly. This, and a decent quantity of machine oil, helped a little, but there was still some sticking. In the end it turned out that one of the z-axis stepper motors was malfunctioning.

This was pretty much unforeseeable. Stepper motors malfunction extremely infrequently, and it's not an option that would usually be considered. Luckily, a guru at the hackerspace recognised the grinding noise my z-axis motor was making as a sign of a short circuit. Even more fortunately, I had a spare motor which I'd bought for my extruder, so we were able to fit that. I now have four working motors and a fairly smooth movement on all axes. We've also begun rewiring the printer, shortening all the wires, running them through the frame so they're out of the way, and making sure all the connections are intact:


Also, check out the new, finger-friendly handle - it's actually a shopping bag holder from Daiso!

From there, I have a whole bunch of configuration to do, including:
  • Setting the maximums for each axis - the endstop settings currently define where one end of each axis is, but not the other yet.
  • Determine and set the steps per millimetre - so that the distances the firmware thinks it's moving each axis are the same as the actual distance they're travelling.
  • Set the feedrate - so the printer knows how fast each axis can move.
And after that I can start thinking about the extruder again...