
So here are my instructions for creating your own multi-coloured LED lantern, perfect for Winter Solstice, pride parades, or any other occasion that would be enhanced by some glowing rainbow goodness.
You will need:
Materials
- A sturdy canvas bag or box with handles (I found mine at Daiso)
- 6 x NeoPixel individual programmable LEDs
- 1 x Flora microcontroller board*
- Ribbon cable^
- 1 x 3 pin male connector (header) and corresponding female connector (housing)
- Cotton thread
- Cloth tape
- 1 x skirt/pant hanger with clips
- 1 x tennis ball
- Packet of small (about 20mm or 30mm) craft mirrors
- Hot glue
- 1 x 3.7v lithium ion (LiPo) battery pack with connector
Tools
- Wire stripper
- Soldering iron & solder wick
- Multimeter
- Hot glue gun
- Sewing needle
- Scissors
- Fabric marker
- Computer with Arduino IDE and Flora driver installed*
*PLEASE NOTE: Adafruit's wearable electronics platform is fairly user friendly, but it does require a very specific set of conditions to be met in order to work. Make sure you have the Adafruit version of the Arduino IDE installed, because it includes the Adafruit board definitions and the NeoPixel software libraries. If you're using Windows, you'll also need to install the Flora driver.
^Measure your canvas bag to see how much cable you need - I ended up using about a metre. Cut out a bundle of 3 wires, which will connect your NeoPixels into the positive, negative and data pins.
Method:
- To get the right effect, you'll need to place a vertical row of 3 NeoPixels on opposite walls of your lantern. The Flora should sit on the bottom of the bag, close to the first NeoPixel. This is the configuration I used:

- Use the fabric marker to mark out where you want to place your Flora and NeoPixels. This will give you a guide for how long to cut your lengths of wire. You'll need 7 lengths:
- From the Flora to the housing connector (using the header and housing connectors allow you to easily detach and play around with the Flora later on)
- From the header connector to the first NeoPixel
- 4 roughly equal lengths to connect the NeoPixels in each row
- A long length to connect the two rows of NeoPixels.
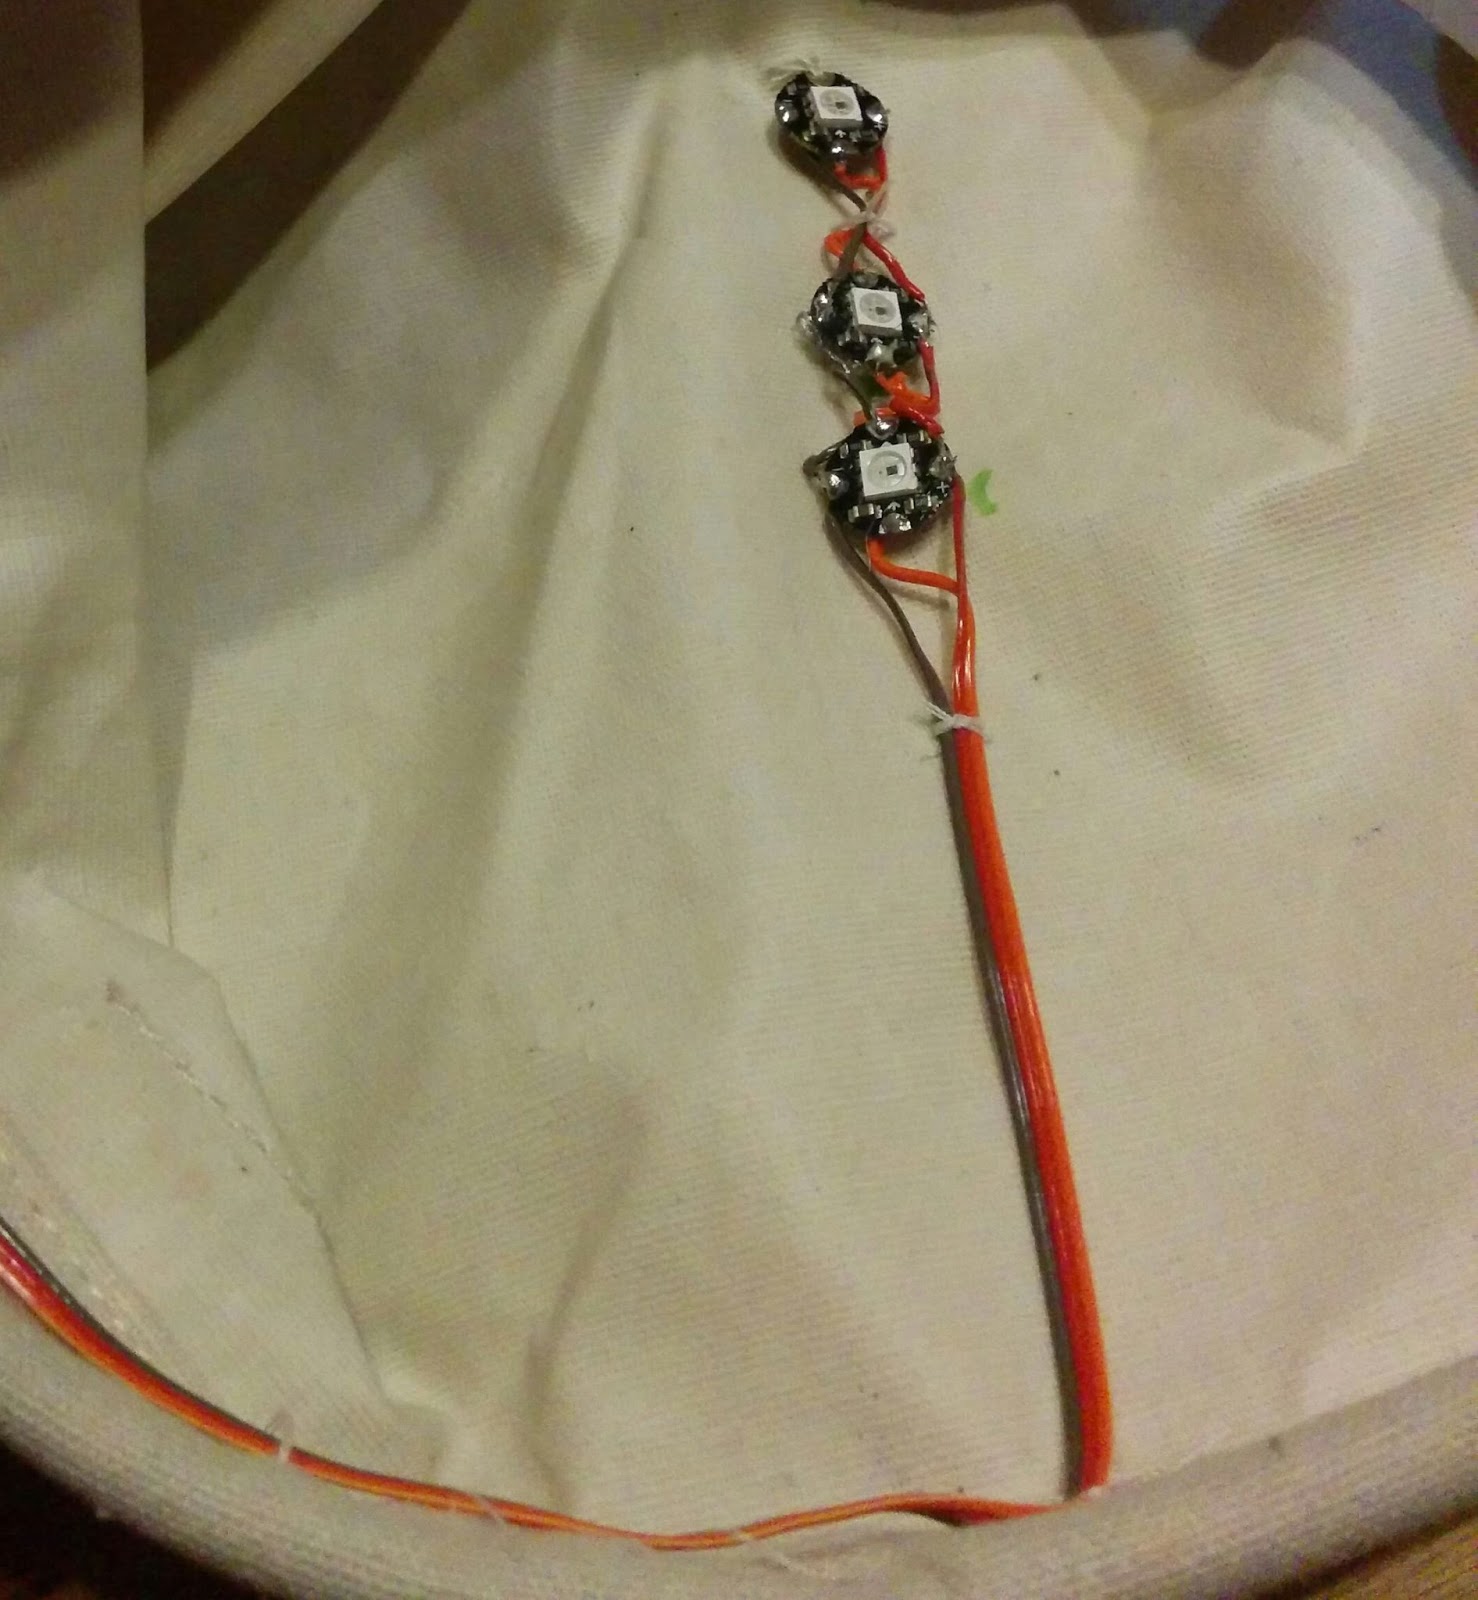
- Strip the ends of the wires and solder the components together in a line, connecting positive pins to the next positive pin in the line, negative pins to next negative, and data pins to the next data.
- On the Flora, use the VBATT for your positive wire, GND for the negative and D6 for the data:
- On the NeoPixels, the pins are clearly marked. Position them so that the arrows indicating the data pins all point in the same direction throughout the circuit:


- Once everything's wired up, you can upload the code onto the Flora. You can open the Strandtest example code and change the values around until you arrive at a range of colours and patterns that you like.

- I ended up with a gentle rainbow glow using this code:
#include <Adafruit_NeoPixel.h>
#include <avr/power.h>
#define PIN 6
// Parameter 1 = number of pixels in strip
// Parameter 2 = Arduino pin number (most are valid)
// Parameter 3 = pixel type flags, add together as needed:
// NEO_KHZ800 800 KHz bitstream (most NeoPixel products w/WS2812 LEDs)
// NEO_KHZ400 400 KHz (classic 'v1' (not v2) FLORA pixels, WS2811 drivers)
// NEO_GRB Pixels are wired for GRB bitstream (most NeoPixel products)
// NEO_RGB Pixels are wired for RGB bitstream (v1 FLORA pixels, not v2)
Adafruit_NeoPixel strip = Adafruit_NeoPixel(6, PIN, NEO_GRB + NEO_KHZ800);
// IMPORTANT: To reduce NeoPixel burnout risk, add 1000 uF capacitor across
// pixel power leads, add 300 - 500 Ohm resistor on first pixel's data input
// and minimize distance between Arduino and first pixel. Avoid connecting
// on a live circuit...if you must, connect GND first.
void setup() {
strip.begin();
strip.show(); // Initialize all pixels to 'off'
}
void loop() {
rainbow(40);
}
void rainbow(uint8_t wait) {
uint16_t i, j;
for(j=0; j<256; j++) {
for(i=0; i<strip.numPixels(); i++) {
strip.setPixelColor(i, Wheel((i+j) & 255));
}
strip.show();
delay(wait);
}
}
// Input a value 0 to 255 to get a color value.
// The colours are a transition r - g - b - back to r.
uint32_t Wheel(byte WheelPos) {
WheelPos = 255 - WheelPos;
if(WheelPos < 85) {
return strip.Color(255 - WheelPos * 3, 0, WheelPos * 3);
} else if(WheelPos < 170) {
WheelPos -= 85;
return strip.Color(0, WheelPos * 3, 255 - WheelPos * 3);
} else {
WheelPos -= 170;
return strip.Color(WheelPos * 3, 255 - WheelPos * 3, 0);
}
}
- When you've tested and troubleshooted and everything is working, you can attach the wired components to your bag. Use cloth tape to attach the Flora to the bottom on the bag, and secure the rest of the wiring in place using a few loops of cotton thread like so:
- Now you can plug in the battery. The Flora has a built-in switch so you can turn your lantern on and off. At this point your lantern will look something like this:
- That looks pretty great on its own, but I decided to add a bit more visual interest by putting some mirrors into the path of the NeoPixels, disco ball style. I attached some tiny craft mirrors to a tennis ball with hot glue, then suspended it on string from my lantern's "handle" - a clothes hanger:

And there we have it. PORTABLE RAINBOWS FOR ALL!!!