Wednesday, 9 November 2016

Ms Fix-It

Like many people who commute on public transport, one of the banes of my existence is that moment when you realise your headphones are out of whack. Perhaps you can only hear out of one ear, or maybe you have to tie the cord in knots and hold it in a very specific position to get sound. I hate the wastage of just throwing out the old set of headphones and just buying another one, not to mention the waste of money. I wouldn't call myself an audiophile, but I do have a really decent set of compact, over-ear headphones that I love, which bit the dust some time ago.

I found this tutorial on Tested.com, and bought some replacement headphone jacks at an electronics store. This tutorial is a decent basic introduction, but it has a few omissions which I had to do more research on:
  • There are more than one type of headphone, and the different types are wired differently. You can tell immediately which type yours are by looking at the jack:

The jack with 2 rings has 3 terminals inside - for left speaker, right speaker and earth.


The type with 3 rings has 4 terminals, the extra being for a microphone - this is the type that usually comes with mobile phones.


      Ultimately, I'd suggest searching the web to find the pinout diagram for your individual model of headphone. I found out that while my headphones contain 4 cables, 2 of them connect to the same terminal on the jack:
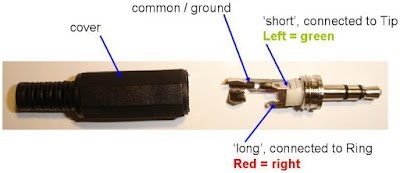
    Image comes from here

    • The tutorial assumes that your headphone cables enclose sheathed copper wires, but mine have very fine wires with an enamel coating for insulation instead. The enamel needs to be removed before soldering. This video shows how to (CAREFULLY) burn it off, which I found worked fine:

      Apparently you can also sand the enamel off, or scrape it off using a sharp knife. Given how thin my wires are though, I feel like I'd just pull the wires apart with these methods.

    Once that part's over, the rest is pretty simple for someone with soldering experience. I happen to have a second pair of busted-up headphones of the same brand (are you seeing a pattern?) which I could practice on before hacking my good pair to pieces. And trust me, this pair is not going to be wearable again any time soon - flexible, "sports" headphones, argh:


    One last thing I must talk about is heatshrink - a plastic sleeve that (oddly enough) shrinks around your wiring when heat is applied, providing protection and insulation. I've only ever used heatshrink at the hackerspace, using a heat gun or a blower attached to a soldering station. I didn't think a hairdryer would be hot enough for this application. But when I asked at the electronics shop, the salesman told me most people use hairdryers.

    I have short hair and am super-lazy with the whole beauty routine thing anyway, so I didn't have a hairdryer. But my mum had a spare. Allow me to present the one thing every modern gal needs in her toolbox: this swell vintage General Electric compact hairdryer! Impress that special man in your life with your fabulous coiffure and ability to fix small appliances!


    And it worked... kind of OK? The heatshrink shrunk, but it took a while (the hairdryer overheated and cut out, so it had to cool down before I could use it again) and came out a little lumpy - it didn't help that I bought heatshrink with too large a diameter. I'd say the hairdryer's fine for most things, and I'll definitely keep it around for future use. But in this case, the finished piece needs to fit snugly inside the cover of the headphone jack. Off to the hackerspace for the final job then.

    *****************

    And now, after some quality time with a proper soldering station, I can hear bass again!! I'm so happy with this!!!!!!


    Tuesday, 25 October 2016

    Softie Party!

    There's something of a baby boom going on in my social circle at the moment. Now, I don't know much about babies, and anything I have that might be called a maternal instinct seems to have been redirected toward cats rather than humans. But one thing I do know is that kids like soft toys, which means IT'S SOFTIE MAKING TIME!

    A couple of instances of design number 1, a squishy rocket ship, have already been deployed to their tiny new owners, hopefully helping to instill their parents' love of sci-fi from the very beginning. As with any space-bound vessel, the first step was to produce some engineering drawings:


    Rocket ship toy drawings

    This was just to get a rough idea of the size, shape and fabrics I'd be using. After I had that all worked out in my mind, I made pattern pieces on baking paper, which I used to trace the shapes in dressmakers chalk and cut out my fabric:

    Cut out fabric shapes for sewing

    It's nothing fancy as patterns go, just flat shapes with decorations. I like to use fleece and felt fabrics, because they're huggably soft, really easy to work with, and very forgiving of a few uneven stitches. The red and black "window" pieces go onto one of the grey rocket body pieces first - and what's a window without someone to wave out of it? I found a couple of these adorable iron-on robot patches at the fabric shop:


    Here you can see the window and its occupant (I had to do a bit of surgery to make it fit), and some "rivets" stitched in metallic embroidery thread. After joining the rocket body to the exhaust flames, I stitched around the outside using buttonhole stitch, adding in a ribbon for hanging the finished piece:


    Buttonhole stitch may not look as professional as a hidden seam, but it's easier to do, and I quite like the homemade, hand-stitched look it gives to the finished pieces.

    Then comes the fun part, stuffing! I use a fluffy polyester stuffing, and a chopstick to jam it into the hard-to-reach parts, like the fins on the rocket.


    After stitching around the last of the stuffing, here's what this finished product looks like. Something tells me the recipients don't care that much about them yet, but hopefully they'll enjoy the cuddliness when they get a bit older.


    My next plan is to make some animal softies for more small humans. Today I found this embossed fleece fabric, which has definitely given me some more softie inspiration!


    Saturday, 20 August 2016

    I Can Haz Surveillance - Part 2

    Part 1

    This is how my DIY projects often go: I have a burst of creativity and enthusiasm, do some research, learn some things. Then I put the project down, intending to come back to it soon. "Soon" usually turns out to be a few months later.

    In the last couple of weeks, I've decided to pick up my cat GPS project in earnest again. In the intervening time I've tinkered intermittently, and managed to solve a couple of problems:

    • The finished unit will have to be as small as possible. I replaced the Flora board, which is inconveniently large and round, with an Arduino Pro Mini, which has a much slimmer profile. It's a simpler board without built-in battery connector or switch - I consider this a positive because the layout of my circuit is more flexible. I also found instructions for getting the GPS to talk to a non-Flora microcontroller and got them talking, which I consider a small triumph.
    • I was concerned about what type of battery to use. The easiest type to attach to a wearable project is a Lithium Polymer (LiPo) battery, but these aren't the most stable. If it's secured firmly into place within an enclosure, no harm should come of it, but still, you can't tell a cat to be careful and I don't want to risk injury. On the other hand, using the equivalent voltage in normal household batteries would make the unit heavier. In the end I settled for a Lithium Ion battery, which is more stable, and also comes in a 3v version, meaning I only have to use one battery. Also loving the pun of fitting a cat with a Li-ion battery (RAWR!)

      I started out with a larger battery that, based on its milliamp hours (mAh), would definitely stay charged for an entire day of cat frolicking. Now though, I've decided to settle for a smaller battery (actually a camera battery) which weighs less but won't last as long. We'll see how that one goes - it's all experimental for now.


    The next phase is to create an enclosure for the components. This will need to be weatherproof, and strong enough to survive having a cat's weight on top of it. Some Hackerspace friends have assured me that the GPS module needs radio line-of-sight to the sky, but not necessarily visual line-of-sight. So I've designed a lidded case to be 3D printed in ABS plastic, which is light and strong:


    The raised bar in the middle of the case is where I'll mount the Arduino and GPS module, using Blu-Tac so I can easily remove them and download the data. Depending on how well the fasteners work, I may have to gaffer-tape around the case while it's in use, to make sure it's secure.

    Once I've put this together, I'll be able to walk around with the unit and test how well it logs data when fully enclosed. If that works, I'll tweak the design so I can mount it on a cat collar. Stay tuned!

    Friday, 29 January 2016

    The Astounding Canine Torch

    It started as a joke over the dinner table. My sister and her partner mentioned that they were trying to do a jigsaw puzzle, which was made more difficult by the poor lighting at their house. At the time, I happened to be finding my way around an Arduino Lilypad light sensor that I'd bought ages ago but hadn't used yet. Since I'm already working on fitting their cat Georgie with a DIY GPS tracker, I joked that I could attach a light sensor and a few LEDs to their dog Cleo, turning her into a night light that would activate when the light levels in a room got too low.

    I should say at this point that I usually disapprove of putting animals in costumes. They look so unhappy and uncomfortable, and I just feel sorry for them. This random Internet cat is a case in point:


    On the other hand, wearables for animals are super-cute, and provide some fascinating logistical challenges. Plus, Cleo wears jackets and harnesses all the time, and doesn't seem to mind. She even sleeps in "pyjamas" in winter, because her short fur doesn't give her much insulation.


    So. The scene was set, the challenge thrown down.

    I would have liked to mount this arrangement to a sturdy fabric harness, but the only ones I could find were far too expensive for a quick novelty project like this one. In the end I opted for a cheap doggie t-shirt from Target. It didn't sit very well in place, and if you're looking to make something for more permanent use, I'd definitely recommend investing in a harness, jacket or other appropriately strong and durable dog apparel that can still be sewn onto. As for the electrical components, I used some bits and pieces I already had in my box of tricks:

    DFRobot Beetle microcontroller
    Battery holder (3 x AAA) with built-in on/of switch
    Lilypad light sensor
    4 x sewable white LEDs
    Conductive thread

    I sewed a felt pocket to the top edge of the shirt to hold the battery pack. It's important when working with animals that you use stable, protected batteries that can be safely knocked around, batted, rolled on, etc. etc. without rupturing or causing any other damage. I would NEVER use lithium polymer (LiPo) batteries on fur babies, as I feel this would most likely end in pain for the animal in question, and vet fees (or at least a healthy amount of guilt) for his or her human.

    So, here's the final arrangement:


    The LEDs are wired in sequence so they're all controlled from the same pin on the microcontroller, and all light up simultaneously. You'll see I insulated the conductive thread with cloth tape, partly to hold it in place, and partly to stop it from coming into contact with Cleo's body. I also completely taped over the circuit on the inside of the shirt. Conductive thread is basically uninsulated wire, and while the voltage involved isn't high enough to hurt an animal, contact with fur could potentially cause a short circuit, which is never pleasant.

    The software I used is nothing too fancy - just the code provided by Sparkfun for a connection between microcontroller, sensor and LED, pretty much unaltered. This code allows the sensor to take an analog read, which produces a stream of numbers in the Arduino IDE's Serial Monitor, reflecting the ambient light levels around the sensor. A "darklevel" is defined, which determines the reading at which the room is considered dark. The code uses the darklevel to trigger the LEDs on when the sensor readings dip below a certain number.


    I changed the pins to reflect the way I'd connected the sensor to the Beetle (the code is written with a Lilypad Simple in mind), and I also changed the darklevel value to reflect the house this ridiculous device would operate in. Every space has different "normal" ambient light levels, so any project using a light sensor has to be specifically calibrated to its environment.

    And here's the very patient Cleo, lighting up the room even more than she usually does with her adorable presence:


    Overall, the doggie night light worked OK, but as I said earlier, it would work much better on a sturdier base than the t-shirt. Conductive thread circuits behave inconsistently when they bend in unpredictable ways. If I hadn't been in such a hurry, I would also have attached the battery pack much more securely, so it couldn't jiggle around so much. Ultimately though, I'd count this as a pretty successful initial prototype. If you could securely connect it to your dog's harness it could be a nice accessory for evening walkies - although in that case I'd recommend adding a clear, waterproof covering over the components.


    I'd like to take this opportunity to thank Lisa and Andrew for kindly allowing me to experiment on their animals - in a way that I'm certain would be approved by any reasonable ethics committee.