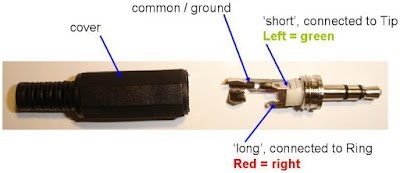
I found this tutorial on Tested.com, and bought some replacement headphone jacks at an electronics store. This tutorial is a decent basic introduction, but it has a few omissions which I had to do more research on:
- There are more than one type of headphone, and the different types are wired differently. You can tell immediately which type yours are by looking at the jack:
The type with 3 rings has 4 terminals, the extra being for a microphone - this is the type that usually comes with mobile phones.
- Ultimately, I'd suggest searching the web to find the pinout diagram for your individual model of headphone. I found out that while my headphones contain 4 cables, 2 of them connect to the same terminal on the jack:
 |
| Image comes from here |
- The tutorial assumes that your headphone cables enclose sheathed copper wires, but mine have very fine wires with an enamel coating for insulation instead. The enamel needs to be removed before soldering. This video shows how to (CAREFULLY) burn it off, which I found worked fine:
- Apparently you can also sand the enamel off, or scrape it off using a sharp knife. Given how thin my wires are though, I feel like I'd just pull the wires apart with these methods.
Once that part's over, the rest is pretty simple for someone with soldering experience. I happen to have a second pair of busted-up headphones of the same brand (are you seeing a pattern?) which I could practice on before hacking my good pair to pieces. And trust me, this pair is not going to be wearable again any time soon - flexible, "sports" headphones, argh:
One last thing I must talk about is heatshrink - a plastic sleeve that (oddly enough) shrinks around your wiring when heat is applied, providing protection and insulation. I've only ever used heatshrink at the hackerspace, using a heat gun or a blower attached to a soldering station. I didn't think a hairdryer would be hot enough for this application. But when I asked at the electronics shop, the salesman told me most people use hairdryers.
I have short hair and am super-lazy with the whole beauty routine thing anyway, so I didn't have a hairdryer. But my mum had a spare. Allow me to present the one thing every modern gal needs in her toolbox: this swell vintage General Electric compact hairdryer! Impress that special man in your life with your fabulous coiffure and ability to fix small appliances!
And it worked... kind of OK? The heatshrink shrunk, but it took a while (the hairdryer overheated and cut out, so it had to cool down before I could use it again) and came out a little lumpy - it didn't help that I bought heatshrink with too large a diameter. I'd say the hairdryer's fine for most things, and I'll definitely keep it around for future use. But in this case, the finished piece needs to fit snugly inside the cover of the headphone jack. Off to the hackerspace for the final job then.
*****************
And now, after some quality time with a proper soldering station, I can hear bass again!! I'm so happy with this!!!!!!


