Saturday, 23 December 2017

A Tale of Two Teardowns

Many of you will know that it's been a big few months for me. In August I made the move from Melbourne to Canberra to take on an IT Apprenticeship. It's been very challenging, but so far pretty rewarding as well, and I'm really enjoying the process of discovering my new city.

View of Lake Burley Griffin and Parliament House from Mt. Ainslie

But as with any big move, there were some hiccups along the way, including the loss of two laptops. This was... not an ideal situation... but I decided to take the opportunity to learn what makes these machines tick. They're two very different pieces of tech, and I made some interesting discoveries along the way.

Microsoft Surface 3

In 2015 this Surface 3 was an unbelievably sleek and chic 2-in-1 tablet/PC, replacing my great, hulking 15.6" Dell laptop, which was a tad cumbersome for streaming TV shows in bed. It served me very well for a couple of years, but had its share of twitches and glitches. To be fair, at least some of its issues may have stemmed from being dropped a couple too many times, and from overloading the USB port with incompatible Arduino boards... <whistles innocently>

Anyway, when it stopped charging properly I wasn't too surprised, and figured it was yet another persistent firmware or driver issue without a satisfactory solution. Then, shortly before I moved out of my place in Melbourne, I found I couldn't connect the charging cable, and realised that just about all of the pins in the micro-USB port had broken off. It was no longer chargeable.

By the time the Surface 3 was released, "computer as appliance" was the norm. The minimal profile of tablets comes at the expense of repairability, and they're basically designed to be junked at the end of the product cycle, which upsets me on principle. Microsoft customer service  told me they don't do repairs on Surfaces - economies of scale mean it's cheaper and easier to just replace them. I also called a couple of independent repair shops, who wouldn't touch it, because older Surface parts are not available in Australia (read: are totally available on eBay, but are probably salvaged or not "genuine parts"). Since my Surface was out of warranty anyway, I decided to attempt my own repairs. The challenges were many and varied:

  • Documentation was a real issue. Most resources online are about the more popular Surface Pro 3, and the internal hardware is different enough that those instructions are not entirely useful. In the end I found this repair guide on iFixit. I would definitely recommend this site to anyone doing smartphone or tablet repairs at home.

  • This device is VERY DEFINITELY NOT MEANT TO BE OPENED. I had to buy a set of specialist tools designed to melt glue and prise apart delicate, lightweight panels. I ended up adding a screen to the list of required replacement parts.
OOPS. Note the white iOpener heat pack, for melting the glue under the screen.
  • Standard screwdriver sizes didn't work for all the screws. I'm not sure why - there may be a metric/imperial discrepancy at work, but I suspect it's more likely a proprietary size. It didn't help that I'd deformed the shape of the indentations on some of the screws, after so many vain attempts to unscrew them. All of the screws had star-shaped Torx heads. Eventually, on the advice of a friend, I used a tiny, 1.0mm flat head screwdriver to get into the points of the Torx star and undo the screws.
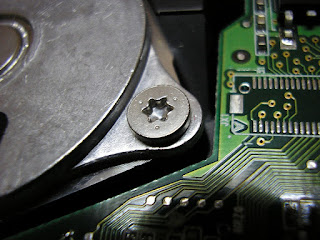
A Torx screw
After a drawn-out process which involved perusing many online instructions, gaining a great new precision screwdriver set (silver lining!), and just tearing into the machine to see what I could find, I managed to get the offending port out. A replacement will literally cost mere cents, and I should hopefully just be able to solder it into place.


The offending area, with port still attached

The dilemma comes with the replacement screen. They look simple enough to attach now that the fussy business of removing the old one has been done - there's only one connection between the tablet and screen electronics, and it's a port. They're also readily available on eBay, but at about $160-$200 they're not especially cheap. Still, it's not much compared to buying a new tablet, and it would be nice to have a second, compact display again. I may buy one some time in the new year, once I've recovered from the cost of buying a new laptop.


HP Elitebook 5730p

I purchased what is effectively a proto-Surface second hand from Connected Community Hackerspace for $50, so I'd have a Windows 7 machine for Arduino projects. Under some versions of Windows 10, the OS has trouble communicating with some boards through the serial ports. There are fixes available, but given the price, it was easier at the time to get a second computer.

And just as well I did, because I still had a computer when my Surface bit the dust. As a replacement is was slightly frustrating - it was a bit older and designed for office use, so the screen resolution wasn't great, and neither was the internal speaker - I plugged in a little Bluetooth speaker for sound. But it sufficed while I couldn't bring myself to fork out the cash for a new computer. And then I spilled a whole glass of water over the keyboard.

The teardown on this machine was a much quicker, easier and more pleasant experience than the Surface, primarily because it's an enterprise model. The Hackerspace received a bunch of them from a member whose company was upgrading its fleet. As such, the Elitebook is designed to be taken apart and have parts replaced by an IT department. There was no glue involved, and all of the screws were of the standard, Phillips head variety. I used this YouTube video as a guide.

Additionally, every part was clearly labelled with a part number, HP re-order code, and in some cases, even the name of the part. It was stupidly easy to do a web search for each part number and determine what it did, enabling me to salvage a few interesting bits and pieces:


Wi-fi and mobile broadband chips

Tiny internal speaker

Audio ports

CMOS battery - this is used to power the computer's real-time clock, so it can stay accurate even when the main power is off

I may or may not end up re-using these, but they're nice to have as souvenirs if nothing else!


The biggest prize here, though, is the 80GB solid state drive (SSD). I was planning to encrypt and dispose of it, but given that it has a standard connector and is fully intact, I'm planning to find a cable and caddy for it, so I can use it as an external drive. Score!


A Quick Note on Hard Drive Disposal

There is much amusement to be had in destroying a good old spinning disk hard drive. Basically, you remove the platter itself and scratch the hell out of it until it's unreadable. Some people recommend drilling holes in them, but I suspect that's more for the fun of using power tools than anything else.

These days, SSDs are most commonly used in laptops, and are really the only option for Ultrabooks and tablets because of size constraints. Short of shoving it into a blender and grinding it to smithereens, no amount of bashing and scratching will make an SSD unreadable. Security experts suggest encryption, followed by deletion of the encryption key. That way, nobody can get at the encrypted data inside.

Sunday, 11 June 2017

When Life Gives You LEDs

I've been making quite a few gifts for babies in recent months, mostly stuffed toys, and all traditional crafts. But when it came to making something for a former colleague's new daughter, I decided to mix things up a bit.

For my housewarming at my current place, I bought a pack of 50 assorted colour frosted 5mm LEDs, attached a bunch to coin cell batteries and stuck them up around the house and garden. Because buying fairy lights is for dudes. I only used about 30 of them, and have been scouting around for a use for the extras ever since. Which led to the eventual conclusion: When life gives you spare LEDs... make night lights!

5 frosted LEDs in various colours


Usually when I work with LEDs, I want to attach them to an Arduino and program them in some way. But this project was, electronics-wise at least, much simpler. All I needed was to string 5 LEDs of various colours together, and attach them to a battery pack. I didn't even need to add a switch, as I already had a battery holder with a built-in switch on hand. This enabled to me brush up on some electronics basics I've been meaning to get into for a while.


Lesson 1: Series vs. Parallel - The Ultimate Battle

I'd heard of parallel and series wiring for LEDs, and knew that how to wire my circuit would be the first decision to make here. I found a few useful resources, such as this blog post and this circuit planning tool. And my conclusion was this:


  • Parallel wiring is regular wiring. The positive terminal of the battery connects to the anodes (positive pins) of each LED, and the negative terminal connects to the cathodes (negative pins). Move along, nothing to see here. If one LED blows, the others will continue working because the circuit's current is passing along the wires that connect all the lights together.
  • Series wiring sounds to my inexperienced mind like it just... shouldn't... work... It involves daisy-chaining the LEDs in a row, connecting the positive battery terminal to the anode of the first LED, then connecting the rest cathode to anode to cathode like some kind of ungodly light bulb centipede, ending with the cathode of the final LED connecting back to the negative battery terminal. Despite my joking around, it's an effective, easy method, but has the disadvantage that if one LED blows, the circuit isn't complete anymore and will stop working altogether. 

I went with parallel wiring because a single point of failure didn't sound like the right approach here. Also because The Human Centipede scarred me for life, and I just couldn't do that to a bunch of innocent diodes.

5 LEDs wired in parallel


Lesson 2: Join the Resistance

I knew from previous projects that I'd need resistors in my circuit, as a buffer between the current coming from the battery and the LEDs themselves. This helps the LEDs last longer, and has the pleasant side effect of toning down their eye-searing full brightness.

Calculating resistor values starts with this formula:

V = I R     aka     Voltage = Current x Resistance

The formula can be transformed to calculate whichever of the three variables you don't know, so in my case I used R = V / I.

I'd tried learning about Ohm's Law previously, but it all went over my head at the time, and sewable LEDs tend to have built-in resistors anyway, so I hadn't bothered figuring it out. This blog post explained it the best for me, but I still wasn't clear on what standard resistor value that would translate to. Later on at the Hackerspace, I spoke to Andy about it and found that as we were discussing the variables involved, everything had clicked and I understood what was going on. He suggested trying out some higher resistor values as well, because the higher the Ohm value, the more of a dimming effect the resistor has on the lights. That ended up being a great call, because even frosted LEDs are extremely bright, as you'll see in my photos of the finished product.


Lesson 3: Get On Board

I've been doing electronics projects on and off for the past 5 years or so, but since I've mostly used conductive thread rather than conventional wiring, I'd never actually prototyped a project using a breadboard. I've been meaning to learn this basic technique for ages, and this was the perfect chance, because it's always a good idea to see how the resistors affect the brightness of the LEDs before soldering everything together.

I recently borrowed the Make: Electronics book from a friend, and it had a great explanation. I also found this cute how-to comic:


And here's my prototyped circuit:

LEDs and battery pack wired together on a breadboard


This may be the most useful of the skills I learned with this project. I'm keen to move onto some more complex Arduino projects soon, and being able to troubleshoot before soldering will be invaluable.


Lesson 4: Lasers Are Awesome

Well, I already knew that. But in making the frame I would mount the LEDs on, I consolidated my knowledge around how to design in 2D for a CNC laser cutter, and how best to configure the machining settings on the Hackerspace cutter to get the results I wanted.

I started with a free DXF format vector drawing of a horse I found online. I imported it into Sketchup and with a few quick adjustments turned that horse into a unicorn, surrounded it with a simple, elegant border, and defined the edges of the piece. I also added five 5mm holes into which the LEDs would slot. The Hackerspace laser cutter has reversed x and y axes in its software configuration, so I also mirrored the image to get the correct final cut:

2D drawing on a unicorn in Sketchup


The final step was to import the image into CamBam, position it in the cutting area, and create a gcode file to feed instructions into the cutting software. With the reversed Y axis, positioning the drawing correctly was a bit of a stretch for my brain, which requires me to rotate maps in the direction I'm going in order to navigate effectively.

2D drawing of a unicorn in CamBam


The Hackerspace laser cutter uses Pronterface, a 3D printing program, to feed the gcode into the machine. I used 4.5mm white acrylic for this project, which gave it a nice frosted appearance. I also cut out four straight pieces in the same material to create a frame on the back of the unicorn piece, which would hold the electronics.

There are a few things I'd change if I did it again, like allowing more time for glue to cure - I was rushing to finish it so in the end I hot-glued everything together. It held together well, but was not exactly the most elegant solution! Here's the back of the finished lamp:

Finished lamp - back


And the front (keeping in mind that reflective surfaces and lit LEDs are a bit hard to photograph):

Finished lamp - front, unlit

Finished lamp - front, lit


I was really, really happy with the final piece. If I were to make these in any quantity, I'd probably get some PCBs made to solder the LEDs to in the proper configuration - anything that involves less hot glue and more structural integrity is a good thing here! But ultimately this was heaps of fun to make, and a great learning experience.